Customizing WooCommerce brand filter options starts with defining the brand source, choosing how brands appear, controlling which brands show in the filter, and deciding how the filter behaves on the shop page. Common changes include brand labels, logo display, multi-select settings, empty brand visibility, and AJAX filtering behavior.
If you are asking how do I customize WooCommerce brand filter options, the main goal is usually to make brand filters easier to use, easier to manage, and better aligned with your store’s navigation, design, and search visibility. This guide covers what to check first, which settings matter most, and how to customize brand filters step by step.
Quick Tips
Smart brand filter customization starts with a few practical decisions before you change display or behavior settings. Here are the quick tips before you get into the details.
- Use one consistent brand source across your products
- Choose a filter style that fits your store layout
- Hide empty brands to keep the filter cleaner
- Enable multi-select only when it improves browsing
- Test AJAX filtering on shop and category pages
- Keep brand filter URLs clean and easy to crawl
How the Brand Filters Work in WooCommerce?
Brand filters work by showing products linked to a selected brand taxonomy. When a shopper chooses a brand, WooCommerce updates the product list to show only matching items. In stores that use WooCommerce dynamic product filters, this usually happens through page reloads, AJAX updates, or SEO-friendly filter URLs.
Technically, brand filters rely on:
- Brand source (usually a taxonomy created by a brand’s plugin)
- Filter mechanism (widget, shortcode, or AJAX filter)
- Query process that updates product results based on the selected brand
What to Check Before Customizing Brand Filters?
Before changing brand filter settings, make sure the basic setup is working properly. Brand filters depend on clean brand data, correct product assignments, and a shop layout that supports filtering without conflicts.
Make Sure Your Store Has a Brand Source
Brand filters need a clear brand source to work with. This usually means a brand taxonomy or a product attribute that is used consistently across your catalog.
Confirm Products Are Assigned to Brands
Check that products are actually linked to the correct brands. If brand assignments are missing or inconsistent, the filter may look incomplete or fail to return expected results.
Verify the Brand Source Works on the Front End
Your brand setup should be available on shop and archive pages, not just inside the admin area. If the brand source is not queryable on the front end, the filter will not return products properly.
Check Theme Compatibility With Filters
Some themes change product loops, archive layouts, or filter placement. This becomes especially important when you want to enable AJAX brand filtering in WooCommerce, because the theme needs to support smooth product updates without breaking the shop layout.
Decide How the Filter Should Behave
Set clear expectations before changing settings. Think about single or multi-select use, empty brand visibility, AJAX updates, and how brand-filtered URLs should work across the store.
How Do I Customize WooCommerce Brand Filter Options: Multiple Methods
WooCommerce brand filter options can be customized in several ways, depending on your store setup and the level of control you need. Some methods use built-in settings, while others rely on widgets, filter plugins, or custom code to change how the filter looks and works. Here is the breakdown of each method:
Method 1: Customize Brand Filters Through Theme Settings
Themes like WoodMart and Blocksy come with built-in shop filter features. That makes it easier to customize WooCommerce brand filter options from the theme settings without using code.
Step 1: Open the Theme Customizer
- Go to Appearance → Customize.
- Open the Shop or WooCommerce settings.
Step 2: Find the Filter Settings
- Look for shop filters, sidebar filters, or product archive options.
- Open the filter-related section.
Step 3: Choose the Filter Location
- Select where the brand filter should appear.
- Use the shop sidebar or off-canvas filter area.
Step 4: Adjust the Filter Style
- Change the layout based on your theme options.
- Edit spacing, dropdown style, or section style.
Step 5: Update the Filter Title
- Change the filter heading if the theme allows it.
- Keep the label clear and simple.
Step 6: Save Your Changes
- Click Publish in the Customizer.
- Make sure the new settings are saved.
Step 7: Check the Shop Page
- Open the shop page and review the filter.
- Test it on both desktop and mobile.
Method 2: Customize Brand Filters Using Widgets or Blocks
Widgets and blocks let you customize how the brand filter appears in different parts of your WooCommerce store. This method is useful when you want more control over filter placement, titles, and sidebar layout without editing code.
Step 1: Open the Widget or Block Editor
- Go to Appearance → Widgets in WordPress.
- If your site uses blocks, open the Site Editor or the relevant template.
Step 2: Find the Filter Area
- Locate the Shop Sidebar, WooCommerce Sidebar, or filter section.
- Choose the area where the brand filter should appear.
Step 3: Select the Brand Filter Widget or Block
- Add the brand filter element to that area.
- Make sure it is connected to your brand source.
Step 4: Change the Filter Title
- Edit the heading shown above the filter.
- Use a simple label like Brand or Browse by Brand.
Step 5: Adjust the Filter Position
- Move the widget or block higher or lower in the filter area.
- Place it where shoppers can find it easily.
Step 6: Review the Display Settings
- Check available options for layout or style.
- Adjust any basic settings the widget or block allows.
Step 7: Save and Test the Changes
- Save or update the sidebar or template.
- Visit the shop page and confirm the filter looks right and works properly.
Method 4: Customize Brand Filters with Advanced Filter Plugins
Advanced filter plugins give you more control over WooCommerce brand filters than the default settings alone. With dynamic Ajax product filters for WooCommerce, you can install the plugin, enable the brands filter, choose a display style, and adjust the filter settings from the plugin panel.
Step 1: Install and Activate the Plugin
- Install the plugin on your site.
- Activate the plugin from your WordPress dashboard.
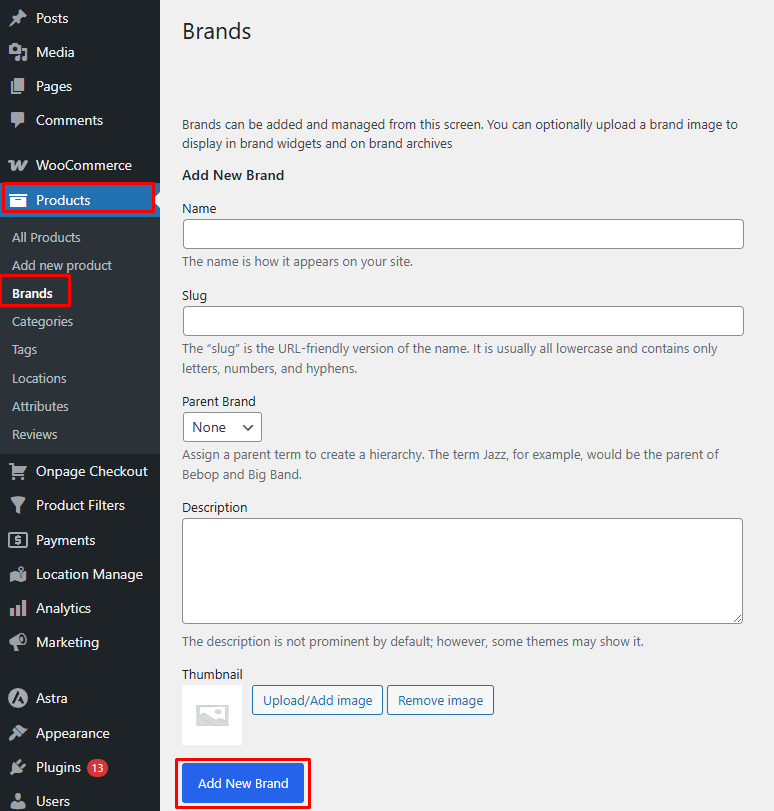
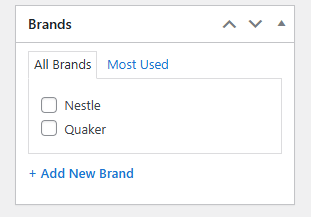
Step 2: Create Your Brands
- Go to Products → Brands.
- Add the brand name, slug, and optional image.
- Save the new brand.
Step 3: Assign Brands to Products
- Go to Products → All Products.
- Edit a product and select the brand from the Brand section.
- Update or publish the product.
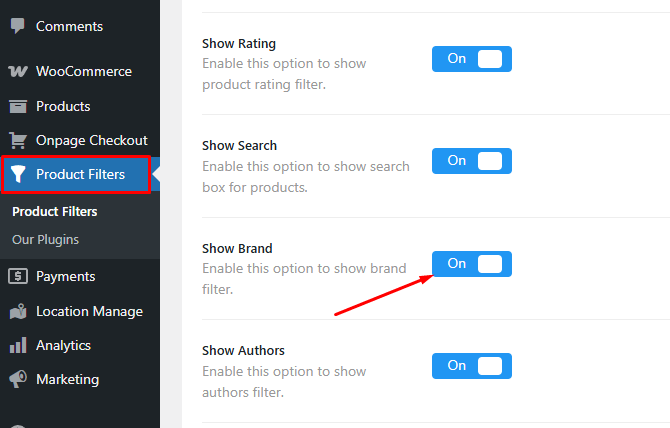
Step 4: Enable Brands in the Filter Form
- Go to Product Filters → Form Manage.
- Find Show Brands.
- Turn it on.
Step 5: Open the Brand Filter Style Settings
- Go to Product Filters → Form Style.
- Choose Brands from the Select Attribute dropdown.
- Open the brand filter settings.
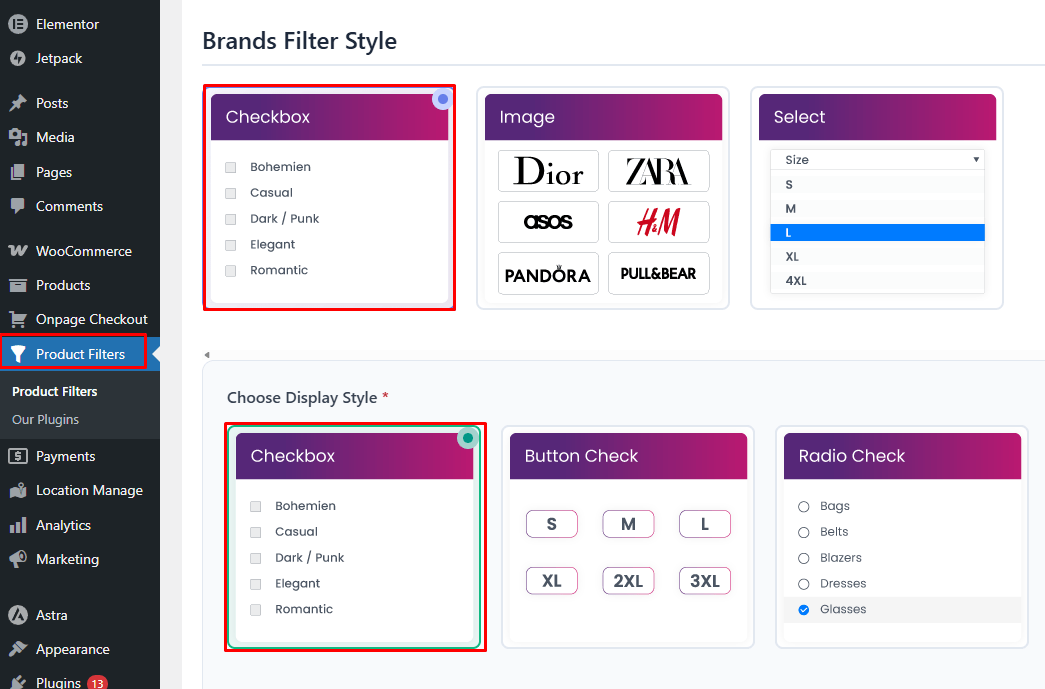
Step 6: Choose the Brand Filter Style
- Select Checkbox, Image, or Select.
- Pick the style that fits your shop layout best.
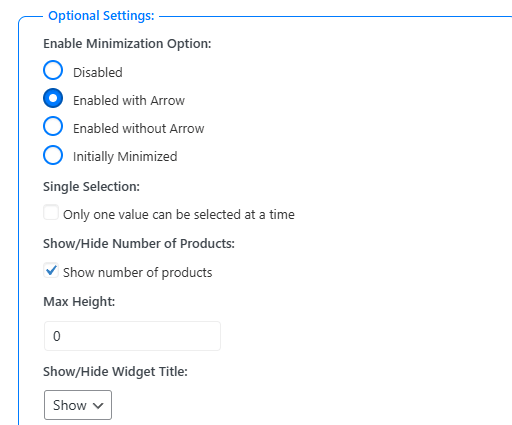
Step 7: Customize the Filter Options
- Show or hide the widget title.
- Set the widget title.
- Change the term order and order direction.
- Enable single selection or product counts if needed.
Step 8: Adjust Advanced Settings
- Choose OR or AND logic.
- Include or exclude specific brands.
- Enable term search for longer brand lists.
- Add a custom CSS class or tooltip if needed.

Step 9: Save and Display the Filter
- Click Save after updating the brand filter.
- Add the [[plugincy_filters]] shortcode to your page, widget area, or sidebar.
- Test the filter on the frontend.
Method 5: Customize Brand Filters with Custom Code
Custom code gives you more control when built-in settings are not enough. This method is useful for changing brand filter labels, styling the filter, adjusting its layout, or modifying how it behaves on the frontend.
Step 1: Identify What You Want to Change
- Decide whether you want to change the label, layout, style, or filter behavior.
- Keep the change specific before editing any code.
Step 2: Add Simple CSS for Style Changes
- Use custom CSS when you only want to change the filter appearance.
- Add the CSS in Appearance → Customize → Additional CSS.
.woocommerce .brand-filter {
padding: 10px;
border: 1px solid #ddd;
}
.woocommerce .brand-filter h4 {
font-size: 16px;
margin-bottom: 10px;
}
Step 3: Change Filter Text or Labels
- Use PHP if you need to change the visible filter title or label text.
- Add the code in your child theme’s functions.php file or a custom code snippets plugin.
add_filter(‘gettext’, ‘custom_brand_filter_label’, 20, 3);
function custom_brand_filter_label($translated_text, $text, $domain) {
if ($translated_text === ‘Brand’) {
$translated_text = ‘Shop by Brand’;
}
return $translated_text;
}
Step 4: Override the Filter Template if Needed
- Use a template override if you need to change the HTML structure of the brand filter.
- Copy the relevant template file into your child theme and edit it there. yourtheme/woocommerce/
- This is useful when you want to change wrapper classes, headings, or element order.
Step 5: Use Hooks for Output Changes
- Use hooks when the filter plugin or theme provides them.
- Hooks let you add or remove content without editing core plugin files.
add_action(‘woocommerce_before_shop_loop’, ‘custom_brand_filter_message’);
function custom_brand_filter_message() {
echo ‘<p class=”brand-filter-note”>Use the brand filter to narrow your results.</p>’;
}
Step 6: Add JavaScript for Interaction Changes
- Use JavaScript when you want to improve filter interaction.
- This can help with toggles, dropdown behavior, or custom frontend actions.
document.addEventListener(‘DOMContentLoaded’, function () {
const filterTitle = document.querySelector(‘.brand-filter h4’);
if (filterTitle) {
filterTitle.addEventListener(‘click’, function () {
this.parentElement.classList.toggle(‘active’);
});
}
});
Step 7: Test the Changes Safely
- Check the filter on the shop page after each change.
- Test on desktop and mobile to make sure the filter still works correctly.
Step 8: Keep the Code in a Safe Place
- Avoid editing the main theme or plugin files directly.
- Use a child theme or code snippets plugin so updates do not remove your changes.
Improving User Experience With Brand Filters: Key Factors to Consider
Brand filters help shoppers feel confident while browsing large online stores with many product choices, especially when they already trust certain brands. A well-designed filter saves time and lowers confusion during product selection. Explore the key factors that make brand filters easier and more effective to use.
- Show Relevant Brands Only: Brand filters should match the products shown on the page, so shoppers see useful options instead of unrelated brand names that create confusion.
- Use Clear and Familiar Labels: Simple labels like Brand or Shop by Brand help users understand the filter quickly and reduce hesitation while browsing.
- Place Popular Brands First: Showing well-known or frequently selected brands near the top helps shoppers find familiar choices faster and scan long filter lists more easily.
- Allow Multiple Brand Selection: Letting users choose more than one brand at a time supports natural shopping behavior and makes product comparison easier without repeating searches.
- Make Filters Work Well Together: Brand filters should update smoothly with price, size, color, and other options to show stronger WooCommerce brand filter benefits in real shopping journeys.
- Keep the Design Clean: A simple layout with checkboxes, dropdowns, or image-based options makes the filter easier to scan and more comfortable to use on all devices.
- Show Clear Selection Feedback: Shoppers should always see which brands are active, with selected options displayed clearly and easy removal controls available for quick adjustments.
- Support Accessibility: Brand filters should work well with keyboards, screen readers, touch devices, and slower connections, so more users can browse the store comfortably.
SEO Considerations When Customizing Brand Filters
Brand filters affect more than user navigation. They influence how search engines crawl, index, and rank your store pages. When implemented correctly, brand filters can target long-tail searches, improve visibility, and support conversions without causing duplicate or crawl issues. Here are the key SEO factors to consider, based on best practices for e-commerce sites:
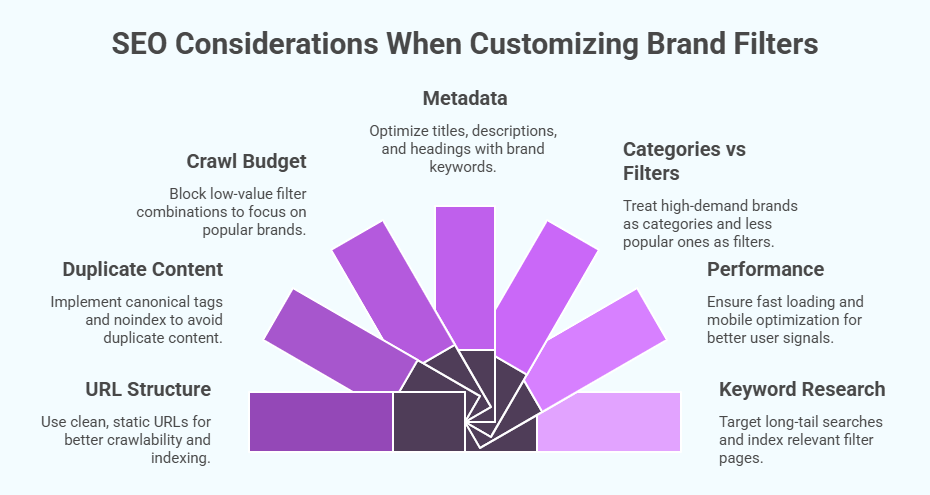
URL Structure and Cleanliness
Use clean, readable URLs like /shoes/nike instead of dynamic parameters. Static URLs are easier for search engines to crawl and index. Avoid excessive parameters that may confuse crawlers or weaken page authority across filtered results.
Handling Duplicate Content
Brand filters can create many similar pages. Use canonical tags to point filtered URLs back to main category pages. Apply noindex to low-value filter combinations to prevent duplicate content without blocking crawl access.
Crawl Budget Management
Uncontrolled filters can waste crawl budget on low-value pages. Block unnecessary combinations and allow indexing only for popular brands. Focus crawl access on pages with search demand to help search engines prioritize important content.
Metadata Optimization
Optimize titles, meta descriptions, and headings for brand-filtered pages using clear brand keywords. Add short descriptions or FAQs on important brand pages to avoid thin content and improve click-through rates from search results.
Categories vs Filters for Indexing
If a brand has strong search demand, treat it as a dedicated category instead of only a filter. Less popular brands should remain filters, but avoid letting them generate indexable pages with little SEO value.
Performance and Mobile Optimization
Filters should load fast and work smoothly on mobile devices. Slow or heavy scripts can hurt rankings. Mobile-friendly, fast-loading filter pages support better user signals, which indirectly help search visibility.
Keyword Research and Long-Tail Targeting
Research brand-based search terms and map them to relevant filter pages. Only index brand filters that match real search intent. Track performance regularly to decide which filtered pages deserve SEO focus.
Common Customization Scenarios (Use-Case Based)
When users search for how to customize WooCommerce brand filter options, they’re usually trying to solve a specific problem, not looking for a full technical breakdown. The scenarios below reflect the most common real-world customization requests store owners have when working with brand filters in WooCommerce, along with practical solutions and clear outcomes for each case.
Scenario 1: “I Want Brand Logos Instead of Text”
Problem
Text-only brand filters can feel generic and are harder to scan, especially for well-known brands. Shoppers often recognize logos faster than brand names, particularly on mobile devices.
Solution
Use an image-based brand filter where each brand is represented by its logo instead of plain text. This usually requires:
- Assigning images to brand terms
- Switching the brand filter display from text to image or swatch style
- Adjusting spacing and alignment for responsiveness
Tools like Dynamic AJAX Product Filters for WooCommerce support image-based brand filters, allowing brands to appear as clickable logos without custom code.
Result
- Faster product discovery
- Improved visual appeal
- Stronger brand recognition and trust
Scenario 2: “I Want Customers to Select Multiple Brands”
Problem
Default brand filters often allow only one brand selection at a time, which limits comparison shopping, especially in multi-brand stores.
Solution
Enable multi-select functionality using:
- Checkboxes
- Multi-select dropdowns
With AJAX-based filtering solutions like Dynamic AJAX Product Filters for WooCommerce, customers can select multiple brands and see results update instantly without reloading the page.
Result
- Better comparison shopping
- Longer session duration
- Higher engagement and conversion potential
Scenario 3: “I Don’t Want Empty Brands Showing”
Problem
Displaying brands with no associated products creates confusion and leads to zero-result pages, which frustrates users.
Solution
Configure the brand filter to:
- Automatically hide brands with no products
- Dynamically update brand availability based on the current category or search context
This behavior is commonly supported by advanced filter plugins and improves both UX and performance.
Result
- Cleaner filter lists
- Fewer dead-end clicks
- More relevant filtering experience
Scenario 4: “I Want SEO-Friendly Brand Pages”
Problem
Some brand filters rely entirely on AJAX or URL parameters that search engines can’t easily index, missing SEO opportunities.
Solution
Choose a filtering setup that:
- Generates clean, crawlable URLs for brand selections
- Allows control over which brand filter pages should be indexable
- Avoids thin or duplicate content
Advanced tools like Dynamic AJAX Product Filters for WooCommerce can combine AJAX filtering with SEO-friendly URLs, giving you flexibility over performance and search visibility.
Result
- Indexable brand-based product pages
- Better internal linking opportunities
- Increased organic traffic from brand searches
FAQs About Customizing WooCommerce Brand Filter Options
Customizing brand filters often raises follow-up questions once store owners begin adjusting display styles, behavior, and performance. The FAQs below address practical concerns that usually come up after initial setup, helping you refine brand filters for better usability, compatibility, and long-term scalability in real-world WooCommerce stores.
Can I Reorder Brand Filter Options Manually?
Yes, you can reorder brand filter options, but the method depends on how brands are stored and managed in your store. Many setups allow alphabetical sorting by default, while advanced filter tools let you apply custom ordering or drag-and-drop sorting. Manual ordering is especially useful when you want to prioritize popular or strategic brands over less relevant ones.
Can I Show Different Brand Filters on Different Product Categories?
Yes, brand filters can be configured to behave contextually based on the current category or product archive. When set up correctly, the filter dynamically shows only brands that are relevant to the selected category. This reduces clutter, prevents irrelevant brand choices, and improves navigation accuracy for users browsing category-specific product collections.
How Do Brand Filters Affect Store Performance?
Brand filters themselves do not negatively impact performance when configured properly, but poor implementation can slow down product queries. Large brand lists, unnecessary page reloads, or unoptimized queries may increase load time. Using optimized filtering methods and limiting visible options helps maintain fast performance, even in large catalogs.
Do Brand Filters Work Properly on Mobile Devices?
Yes, brand filters can work well on mobile, but they must be optimized for smaller screens. Mobile-friendly layouts such as collapsible panels, searchable dropdowns, or compact checklists improve usability. Testing brand filters on multiple devices ensures touch interactions remain smooth and that filters don’t overwhelm the mobile shopping experience.
Can Brand Filters Be Used with Page Builders or Custom Shop Layouts?
In most cases, brand filters can be integrated with custom shop layouts and page builders, provided the product loop remains compatible. Filters rely on WooCommerce’s core querying system, so as long as the layout doesn’t break that structure, brand filters will function correctly across custom-designed shop and category pages.
Why Isn’t My Brand Filter Updating Products Correctly?
This issue usually occurs due to missing brand assignments, theme conflicts, or incorrect filter targeting. It’s important to confirm that products are properly linked to brands and that the filter is querying the correct taxonomy or attribute. Conflicts with heavily customized themes can also prevent filters from updating results as expected.
Concluding Thoughts
Customizing brand filters helps customers find the right products faster and with less effort. When brands are clear and easy to use, shopping feels simple and organized. Small changes, like adjusting how brands appear or how filters behave, can make a big difference.
Many store owners reach a point where they wonder how do I customize WooCommerce brand filter options without making things complicated. By focusing on clear steps, user-friendly layouts, and smart filter behavior, you can improve navigation and keep visitors engaged. With the right setup, brand filters become a helpful part of your WooCommerce store instead of a confusing feature.